Purchase Order Processing
Introduction
Welcome to the New World ERP Purchase Order Processing Guide. This manual will guide you through both the setup and processing aspects of Purchase Order Processing. Designed for use by either a singular centralized purchasing department or by multiple departments in a decentralized purchasing environment; the Purchase Order (PO) module will assist users in purchasing goods and services.
This Purchase Order module is designed to create purchase orders and encumber funds to pay for those purchases. The purchase order is a binding contract where a vendor commits to sell the municipality a good or service at an agreed upon price. The municipality verifies that the funds are available to pay for the good or service and agrees to pay the vendor promptly upon delivery.
Requests for goods that end up on a purchase order can originate from a number of areas. Departmental requisitions could be the source of the request. Requests can be added as a by-product of the bid and contract processes. Requests can also be added manually to a purchase order.
Purchase orders are dynamic documents. Once issued, a user may need to amend the purchase order. This may include adding or removing items, changing an item, voiding or completing the purchase order or individual items. The purchase order number and the vendor to which the purchase order was sent are the only things that cannot be changed.
When a purchase order is posted or changed, a journal is created to update the appropriate encumbrance balances in the general ledger. As a sub-ledger to the general ledger, the purchasing system also offers audit reports that display the sub-ledger encumbrance balances. The purchase order process determines whether or not discrepancies exist between the sub-ledger balance and the corresponding balance in the general ledger.
Security and authorizations are critical parts of the Purchase Order module. The type of purchasing environment along with the municipality’s specific rules and procedures will determine the level, type, and sophistication of the security setup requirements.
This guide is divided into two sections:
The System Administration Guide will focus on the setup components necessary to utilize Purchase Order Processing within New World ERP. This will include detailed information on “master files” that must be set up such as Purchase Order Types. Additionally, it will also include the security settings which will be utilized to enable workflow and tailor user options to the organization’s needs.
The End User Processing Guide will describe the steps, workflow and options available in Purchase Order Processing to the end-user. It will guide the user through the process from purchase order creation, budget validation, tracking approvals, changes, inquiry, in addition to traditional paper purchase order generation. Included in this section will be a guide to the standard reports available in the software.
This document is available in Microsoft Word format to allow for customization to your organization’s particular needs and procedures.
System Administrator Guide
Company FM Settings
The Company FM Settings area contains universal settings that control system behavior within the Procurement Module.
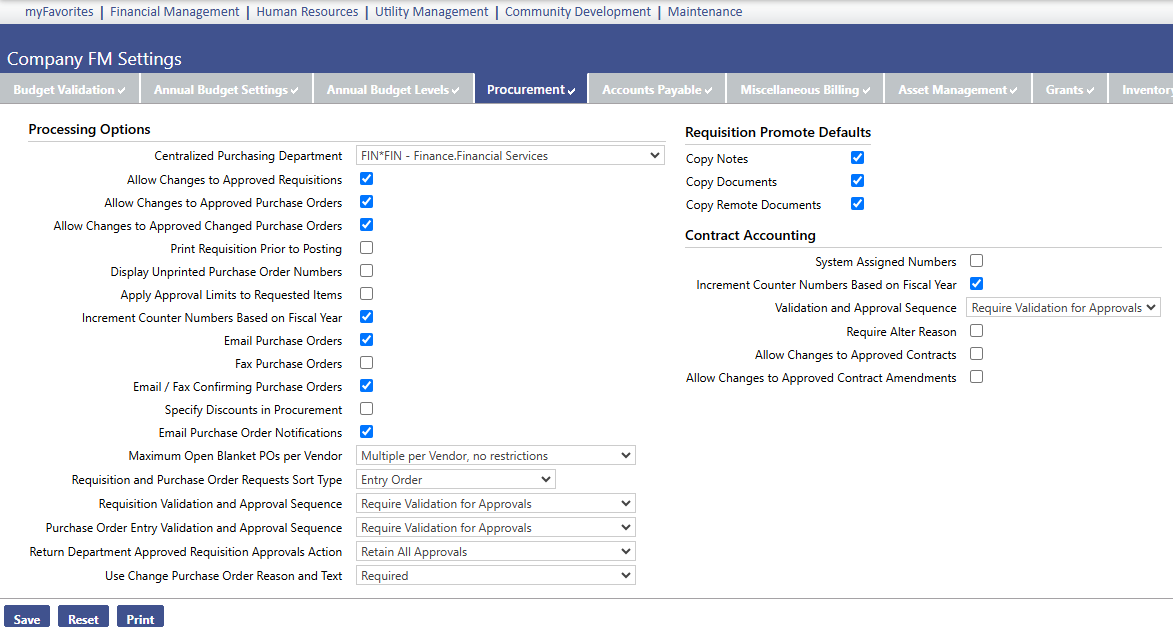
Maintenance > Financial Management > Company FM Settings > Procurement Tab
Centralized Purchasing Department – If a functional department is selected, each purchasing sub-ledger journal created as a result of posting a purchase order will be assigned to this functional department. This can be useful during journal processing as a way to segment sub-ledger review and posting responsibilities. Often times, a new functional department is created for this specific purpose, with a name such as “Finance Sub-ledger Journals.” Process Manager rights are provided only to the journal processing personnel who should have access to “Finance Sub-ledger Journals”. If a Centralized Purchasing Department is not selected, then the functional department utilized during Purchase Order Entry will be used as the functional department of the resulting purchase order journal.
Allow Changes to Approved Requisitions – This check box is related to the Requisition module only.
- Selected: Users will be able to change/alter requisition elements for which they have security access. The system will require the user to validate the requisition after a change has been made.
- Cleared: Will prevent users from being able to change certain financial related information on a requisition as it goes through the approval process. The only way certain changes can be made, is to return the Requisition to the original user that created it.
Allow Changes to Approved Purchase Orders –
- Selected: Users will be able to change/alter purchase order information for the purchase orders for which they have security access. The system will require the user to validate the purchase order after a change has been made.
- Cleared: Will prevent users from being able to change certain financial related information on a purchase order as it goes through the approval process. The only way certain changes can be made, is to return the Purchase Order to the original user that created it.
Allow Changes to Approved Changed Purchase Orders –
- Selected: Users will be able to change/alter purchase order information that has already been modified for the purchase orders for which they have security access. The system will require the user to validate the changed purchase order after a modification has been made.
- Cleared: Will prevent users from being able to change certain financial related information on a modified purchase order as it goes through the approval process. The only way certain changes can be made, is to return the Changed Purchase Order to the original user that created it.
Print Requisition Prior to Posting – This check box is related to the Requisition module only.
- Selected: Will require a Requisition to be sent to myReports prior to it being posted.
- Cleared: Will allow a Requisition to be posted without it being printed.
Display Unprinted Purchase Order Numbers –
- Selected: System will assign purchase order numbers at time of creation. These numbers will be immediately visible.
- Cleared: System will wait to assign purchase order numbers until the point at which all approvals have been made. The PO will be printed.
Apply Approval Limits to Requested Items –
- Selected: If dollar thresholds are being set for purchase order approval levels in Process Manager, this will apply the dollar threshold to the individual PO items, instead of the entire PO amount.
- Cleared: If dollar thresholds are being set for purchase order approval levels in Process Manager, this will apply dollar thresholds to the entire amount of the purchase order.
Increment Counter Numbers Based on Fiscal Year – The system assigns counter numbers to requisitions and purchase orders. These system generated numbers begin with the year the requisitions and/or purchase orders are created. For example, we might see purchase order # 2012-0000058.
- Selected: The system will change the year portion of the counter numbers from 2012 to 2013 when the new fiscal year begins, i.e. July 1, 2012.
- Cleared: The system will change the counter numbers when the new calendar year begins on January 1st. Additionally, the eight numbers following the year portion of a Requisition or Purchase Order Number are based on counters found in Company FM Settings, on the Counters Tab.
Email Purchase Orders –
- Selected: Will enable Email Purchase Order functionality, and will add an Email PO icon to the workflow on the Purchase Order List and Changed Purchase Order List screens. This will allow you to email purchase orders to vendors.
- Cleared: Email Purchase Order functionality will not be enabled. The Email PO icon will not be visible on either the Purchase Order List or the Changed Purchase Order List screens.
Fax Purchase Orders –
- Selected: Will enable Fax Purchase Order functionality. This will add a Fax PO icon to the workflow on the Purchase Order List and Changed Purchase Order List screens. This will also allow the purchasing agent to fax purchase orders to vendors from within New World ERP. Note that a Fax modem must be purchased and installed on the New World server in order for this functionality to be possible.
- Cleared: Fax Purchase Order functionality will not be enabled. The Fax PO icon will not be visible on either the Purchase Order List or the Changed Purchase Order List screens.
Email/Fax Confirming Purchase Orders –
- Selected: Will also apply the Email and Fax Purchase Order functionality to Confirming Purchase Orders.
- Cleared: Email and Fax Purchase Order functionality will not be applied to Confirming Purchase Orders.
Specify Discounts in Procurement –
- Selected: Will allow discount percent to be entered and taken during the requisition entry, purchase order entry, or change purchase order entry processes. A Discount Percent field is added to each of these screens, allowing a number with up to two decimals to be entered. The system then calculates and displays a discounted price per unit, in addition to the original List Price per Unit.
- Cleared: The Discount Percent field is not available or visible as described above.
Maximum Open Blanket PO’s per Vendor – The following three options are available, which will only affect Blanket Purchase Order Types.
- One per Vendor: Each vendor can have only one open blanket PO at a time, regardless of New World user or department (most restrictive option).
- Multiple per Vendor, one per department: Each functional department can have one open blanket PO per shared vendor.
- Multiple per Vendor, no restrictions: Users can create as many blanket POs as needed per vendor.
Requisition and Purchase Order Requests Sort Type – The following two sort type options affect the sort order for Requisitions and Purchase Orders on both of their respective Item List screens and on their respective Edit Listing Reports.
- Alphabetical by Description: Items will sort alphabetically by the Item Description.
- Entry Order: Items will sort based on the order the items were entered, with the first item at the top.
Requisition Validation and Approval Sequence – The following three options affect the order that the workflow must follow on the Requisition screens.
- Require Approvals for Validation: Requires approvals to be completed before the system will allow validation to begin.
- Require Validation for Approvals: System validation must be completed before approvals can begin. This option is the most common, and is recommended in most situations.
- Require No Dependencies: Validation and approvals can be done at any time, independent of one another.
Purchase Order Validation and Approval Sequence – The following three options affect the order that the workflow will follow on both the Purchase Order and Changed Purchase Order screens.
- Require Approvals for Validation: Requires approvals to be completed before the system will allow validation to begin.
- Require Validation for Approvals: System validation must be complete before approvals can begin. This option is the most common, and is recommended in most situations.
- Require No Dependencies: Validation and approvals can be done at any time, independent of one another.
Return Department Approved Requisition Approvals Action – The following two options are available (but only applicable if the Requisition module is being utilized), which will determine what happens to previously provided approvals whenever a requisition is returned through the Department Approved Requisitions area. The options are:
- Retain All Approvals
- Cancel All Approvals
Use Change Purchase Order Reason and Text – The following three options determine if a user needs to enter a reason when making a change to a purchase order in the Changed Purchase Order area.
- Not Used: When a change is made, no message appears and the user can proceed as desired.
- Optional: A warning message suggests that the user provide a reason for the change. The user can choose not to provide a reason, click Accept, and the desired change will be saved.
- Required: An error message alerts the user that a reason code must be supplied in order to save the change.
The Changed Purchase Order Reasons can be customized by entering values in Validation Set # 357 – Changed Reason Code.
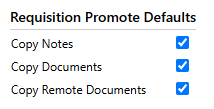
Requisition Promote Defaults – These are only applicable if the Requisition module is being utilized. When a requisition is promoted into a purchase order, the user is given an option of copying Notes, Documents, and Remote Documents attached to the requisition, onto the purchase order. Checking these boxes in Requisition Promote Defaults determines if these three boxes will be defaulted as either selected or cleared when the user arrives at the Promote to Purchase Order screen.
Procurement Validation Sets
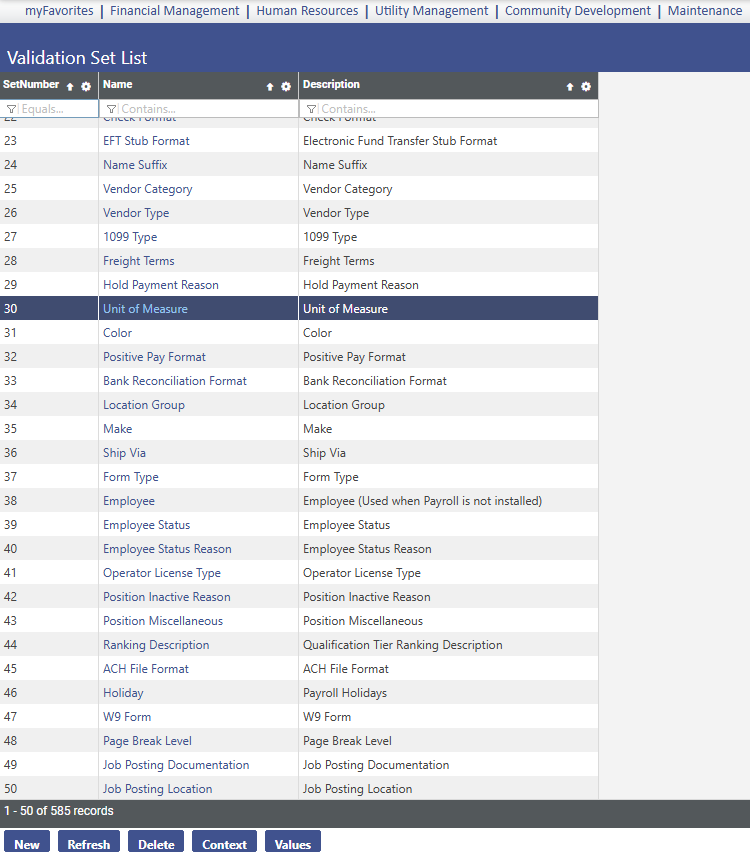
Maintenance > new world ERP Suite> System > Validation Sets > Validation Set List
Scroll to the appropriate Validation Set and highlight its row. Clicking on the Values button will reveal any Value and Description combinations which have previously been created, as shown in the next screen shot. If a new value and description combination is needed, clicking on the New button will allow those items to be entered.
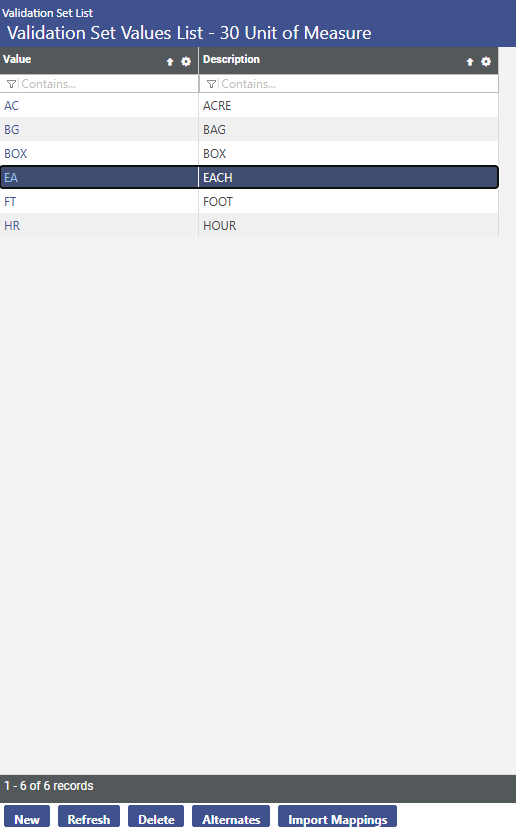
# 30 – Unit of Measure – Units of Measure are used along with Items, throughout the New World Procurement, Inventory, and Accounts Payable modules. Also note this same validation set is used for units of measure in the Miscellaneous Billing module. Examples: EA – Each, BX – Box, CS – Case, DZ – Dozen, GL – Gallon, HR – Hour, LB – Pound, RM – Ream.
# 37 – Form Type – A suggested value of “STD PO” and description of ‘Standard Purchase Order’ can be entered. This will later be assigned to the purchase order form, which will be created in the New World Form Layout area. Additional purchase order formats may need to be created, depending on variations of the standard purchase order form required.
|
Validation Set |
Validation Set Description |
Where Used |
Purpose |
Example |
|---|---|---|---|---|
|
13 |
Project Category |
Project Maintenance Screen – General Tab |
Assigns the project to a category for inquiry/reporting |
Infrastructure projects |
Purchase Order Types
Purchase Order Types are used to define and control various aspects of purchases being made. Each type can be assigned specific rules, after which these PO Types will be assigned to users in User Based Security. In addition, reports can be run and inquires made based on these PO types.
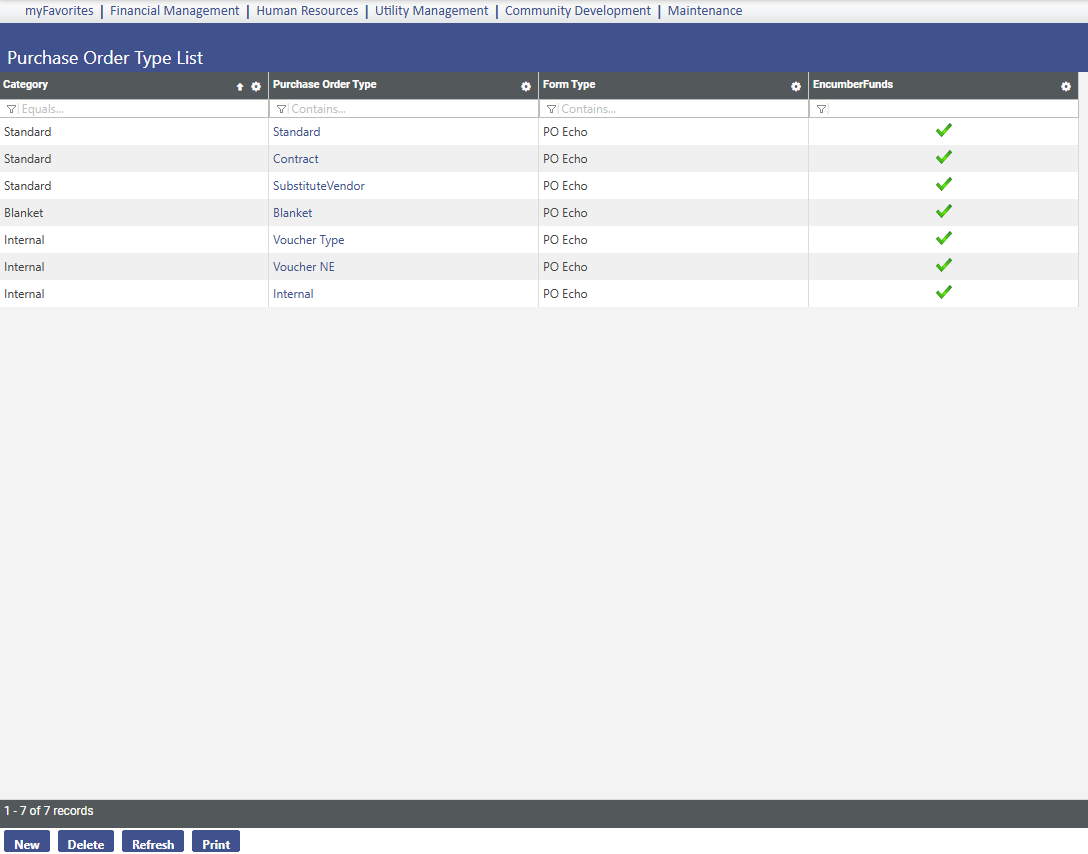
Maintenance > new world ERP Suite > Procurement > Purchase Order Types
Click the New button to create a new purchase order type. The following screen will appear:
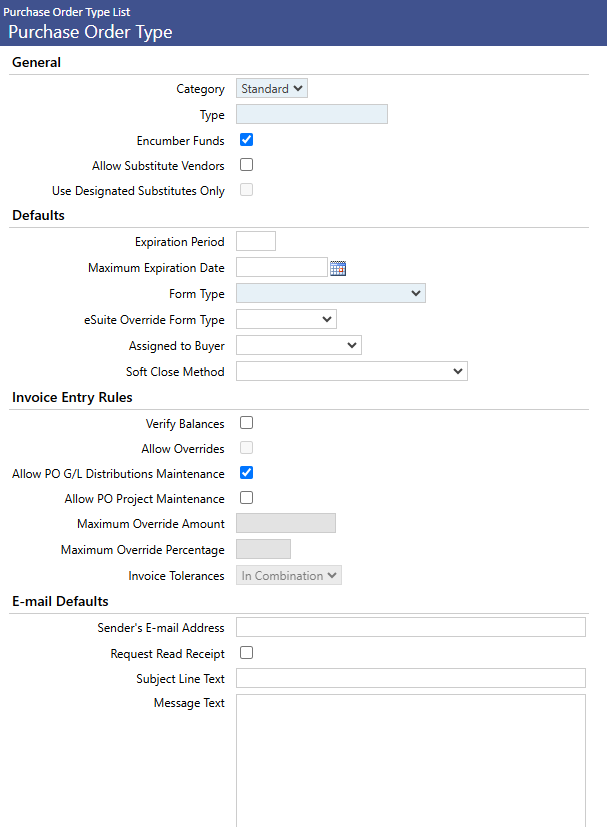
Category – Select Standard, Blanket, or Internal.
Type – Give the PO type a name; Standard, Blanket, or Internal.
Standard: Multiple items can be processed on one PO to a vendor.
Blanket: The intention for a Blanket PO is for only one item to be entered on a Blanket PO. A warning message will appear if more than one item is included. The one item can be very general, such as “supplies.”
Internal – This type of PO is for voucher processing.
Encumber Funds –
- Selected: Will create encumbrance journal.
- Cleared: No encumbrance journal will be created.
Allow Substitute Vendors – Generally used for Blanket POs that have multiple vendors.
- Selected: Allows substitute vendors to be selected for the purchase order. Useful for Blanket Purchase Orders that may have multiple vendors.
- Cleared: Vendor cannot be modified after PO has been entered.
Use Designated Substitutes Only – Available only if Allow Substitute Vendors is selected.
- Selected: Allows specific, designated vendors to be assigned to a purchase order. This will allow a user to select from only the designated vendors assigned, instead of every vendor in the vendor list.
Expiration Period – Defaults into the PO upon creation. This gives users a warning when a PO tries to be processed after the expiration period. The expiration period is defined in days.
Maximum Expiration Date – Defaults into the PO upon creation. Gives users a warning when a PO in processed after the expiration date.
Form Type – Specifies which type of PO Form will be printed when this PO Type is used.
eSuite Override Form Type – This is an optional PO form to be used in eSuite if different from the selected standard Form Type.
Assigned to Buyer – Default buyers can be assigned for each PO Type.
Soft Close Method – Default soft close methods can be assigned for each PO Type. Even if a default soft close method is assigned to a PO Type, various soft close methods could still be utilized on an individual PO when performing year-end processing.
Verify Balances –
- Selected: Will verify the amount entered against the PO in Accounts Payable Invoice Entry to the amount of the PO.
- Cleared: The amount entered against the PO in Accounts Payable Invoice Entry will not be verified against the PO.
Allow Overrides – Available only if Verify Balances is selected. A user must have PO Override abilities in User Based Security to be able to override.
- Selected: Can create maximum override amounts or %.
- Cleared: Cannot create maximum override amounts or %.
Allow PO G/L Distributions Maintenance –
- Selected: Changes to the General Ledger (G/L) distribution can be made when a purchase order is pulled into an invoice.
- Cleared: Changes to the G/L distribution aren’t allowed once a purchase order is pulled into an invoice.
Maximum Override Amount – Available only when “Allow Overrides” is selected. Represents the maximum amount an invoice can differ from the original purchase order amount.
Maximum Override Percent – Available only when “Allow Overrides” is selected. Represents the maximum percentage an invoice can differ from the original purchase order amount.
Invoice Tolerance – Available only when “Allow Overrides” is selected. Determines how the override amount/percent will be used.
- In Combination: Uses both maximum amount and percent to validate invoice amount against PO amount.
- Individually: Uses either maximum amount or percent to validate invoice amount against PO amount.
Senders Email Address – Enter the email address these PO Types will be sent from if the email functionality is being used.
Request Read Receipt – Check if you wish to attach a read receipt to all purchase orders emailed from within New World ERP.
Subject Line Text – Can enter default subject line text for emailing purchase orders. A system default subject will be utilized if nothing is entered.
Message Text – Can enter default message text for emailing purchase orders. A system default message text will be utilized if nothing is entered.
Purchase Order Security
Permissions
User Permissions – Purchase Order security templates have to be created in order to define the permissions you wish end users to see. Determine if one template is sufficient or if multiple templates will be required. Define all users and identify the appropriate templates that will need to be assigned to each user.
Permission Type – Company Applications
Feature Group – Purchasing
|
App |
Component |
Description |
All |
Add |
Change |
Delete |
View/Use |
|
|---|---|---|---|---|---|---|---|---|
|
FM |
Changed Purchase Order Edit/Post Listing |
|
x |
|
|
|
|
|
|
FM |
Changed Purchase Order |
|
x |
|
|
|
|
|
|
FM |
Changed Purchase Order |
|
x |
|
|
|
|
|
|
FM |
Changed Purchase Order |
|
x |
|
|
|
|
|
|
FM |
Changed Purchase Order |
|
x |
|
|
|
|
|
|
FM |
Changed Purchase Order |
|
x |
|
|
|
|
|
|
FM |
Changed Purchase Order |
|
x |
|
|
|
|
|
|
FM |
Changed Purchase Order |
|
x |
|
|
|
|
|
|
FM |
Changed Purchase Order |
|
x |
|
|
|
|
|
|
FM |
Changed Purchase Order |
|
x |
|
|
|
|
|
|
FM |
G/L Distribution Edit |
|
x |
|
|
|
|
|
|
FM |
G/L Distributions |
|
x |
|
|
|
|
|
|
FM |
Purchase Order -Create/Edit |
|
x |
|
|
|
|
|
|
FM |
Purchase Order Edit/Post Listing |
|
x |
|
|
|
|
|
|
FM |
Purchase Order Error Listing
|
|
x |
|
|
|
|
|
Permission Type – Company Applications
Feature Group
|
App |
Component |
Description |
All |
Add |
Change |
Delete |
View/Use |
|
Checkout |
Undo |
Finalize |
Reminder |
|---|---|---|---|---|---|---|---|---|---|---|---|---|
|
FM |
Budget Account Documents |
Ability to add, view and work with documents in budget maintenance. Any user attaching documents to the budget will need this permission. Despite the availability of a “Change” permission, document attachments cannot be changed. |
ü |
ü |
ü |
ü |
ü |
ü |
ü |
|
|
|
|
FM |
Budget Account Notes |
Ability to add Notes in budget maintenance. Any user attaching notes to the budget will need this permission. |
ü |
ü |
ü |
ü |
ü |
ü |
|
|
|
|
User Based Security
Purchase Order Types – The Purchase Order Type(s), which were previously created, have to be assigned to the appropriate users that will be entering Purchase Orders. A user will only be able to create Purchase Orders for the Purchase Types that have been assigned to them.
Purchasing Sub-ledger – Determine what users will have supervisor privileges and budget override capabilities. In addition, select the G/L Organization Sets each user will be able to enter purchase orders against.
Process Manager
Map out the desired approval process for all departments and users for the following Purchase Order processes which will be utilized in the system:
Purchasing - Entry – This process governs Purchase Order Entry. Define the workflow approvals for purchasing entry for all departments. Next assign the users to appropriate departments and levels where they will reside.
Purchasing - Change Order Processing – This process governs Change Purchase Order Entry. Define the workflow approvals for change purchase order entry for all departments. Assign the users to appropriate departments and levels where they will reside.
Purchasing - Procurement Inquiry – This process governs Requisition, Purchase Order, and Accounts Payable Inquiry access. Assign departments that will have purchase orders entered against them. Assign the users to the departments for which they are allowed to inquire on purchase order information.
Purchase Order Processing – Entry
Purchase Orders is one of the principal products generated within the Purchasing Department. Users will go to this area to enter purchase orders as well as approve, print, and post those transactions. Users will also be able to attach any supporting documents and/or notes.
Purchase Order List
This Purchase Order List screen shows all edit mode purchase orders that are being created. Depending on how security is configured, a user may have the option to just see the purchase orders they created or all of the purchase orders within the departments they are assigned. The list screen gives basic information about the purchase order. Purchase Orders can be opened by clicking on the purchase order number or the word Edit. In addition, purchase orders on the list can be sorted by clicking on any of the various column headers. Purchase order attachments (if any) can be viewed by clicking on the attachments icons on the right side of the list screen (not shown).
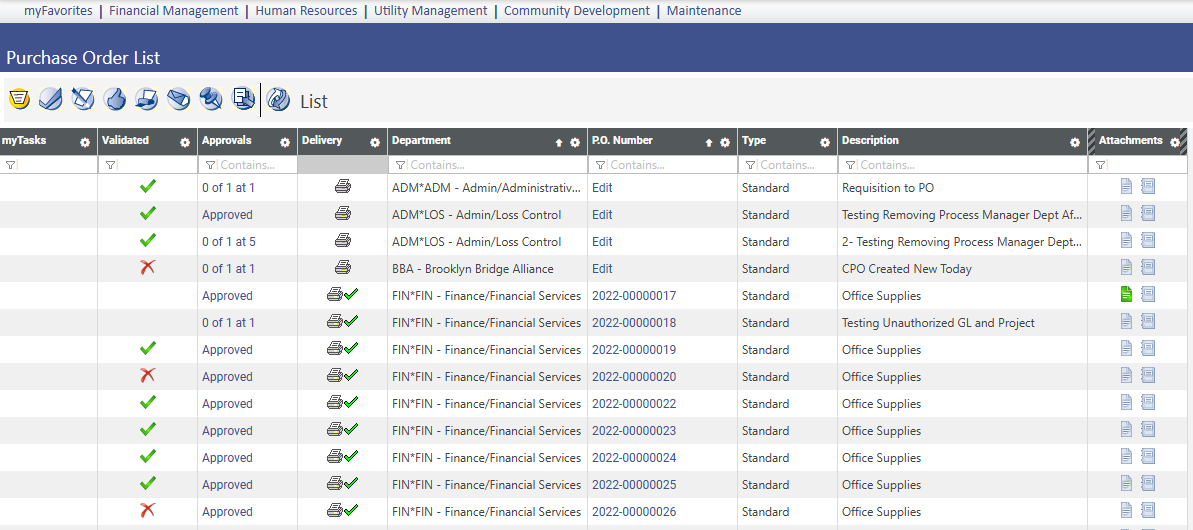
Financial Management > Procurement > Purchasing > Purchase Orders
Entering Purchase Orders
Clicking the New button on the Purchase Order List screen will allow a user to create a new purchase order.
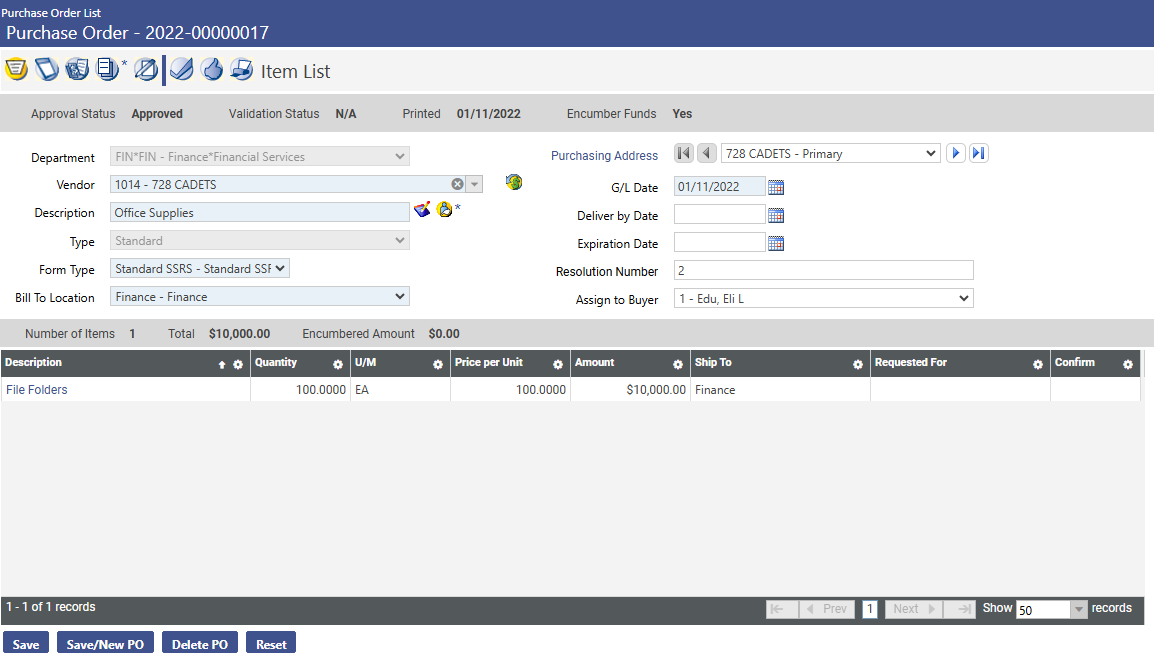
Purchase Order Entry Screen
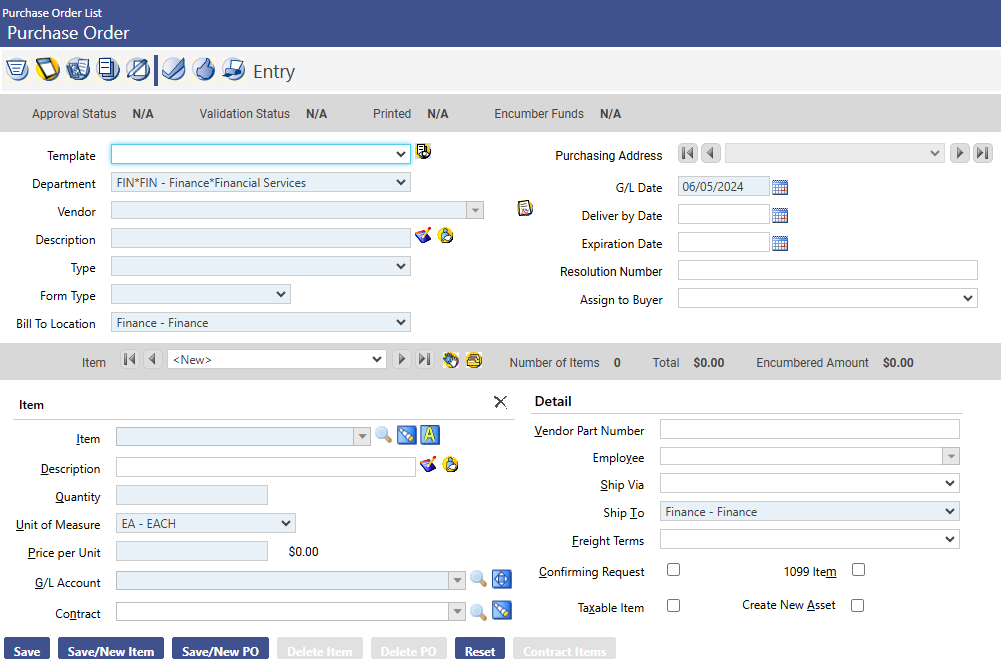
The top portion of this screen is the purchase order Header. The Header contains general information related to the purchase order. The bottom portion is where the entry of the item detail occurs. The following is a description of each field and icon available on the Purchase Order Entry screen.
Header Section
Templates – This field can be utilized to pull in PO templates for recurring purchase orders. Using this feature will fill in all of the fields previously entered on a template purchase order.
Copy PO Icon – Allows a user to search for a specific PO that was created in the past, and then recreate it. Searching can be performed by vendor and/or by PO number. Save/Maintain copies a purchase order and returns the user to the Purchase Order Entry screen. Save/New copies the purchase order and returns the user to the Search screen to copy another purchase order.
Copy Purchase Order screen
Department – Select the department for which the purchase order is being generated. This list pulls from the department’s setup in Process Manager. Departments will only appear for which a user has security clearance to enter purchase orders.
Contract Items – Only available if the Contract Accounting module is being used. If the Contract module is active, this is where the Purchasing Department would enter the contract information.
Vendor – Select the vendor to be used to purchase these items. It is possible to search the vendor list by typing part of the vendor name or by using the vendor number. The system will narrow down the available vendors based on the search criteria entered.
Description – Information put into this field will show on the Purchase Order List screen. This description identifies the purchase order for internal purposes. It is meant to be an overall description of the PO summarizing the items to be purchased. Example: Office Supplies or Auto Parts. It is differentiated from the detailed, bottom half of the purchase order, where a user can have multiple items with detailed descriptions for each item being purchased.
One Time Message – This optional field is designed to print on the bottom of the standard NWS Purchase Order Form, under the Special Instructions section. The one time message icon will have an asterisk next to it when a message has been entered.
Type – The type identifies the type of purchase order being entered. These pull from the PO types that were created for the organization. There are three PO types which are commonly created and used. They are Standard, Blanket, and Internal.
Form Type – Will default in based upon selection of the PO Type. This identifies the way the PO form will look when it’s printed.
Bill to Location – Defaults in based upon the Functional Department that was selected above. The drop-down menu may be used to change the Bill To Location, and would show all locations that were designated as “Bill To” locations in the system.
Purchasing Address – Defaults in after a Vendor is selected. Hovering over the address will show additional details. It may also be possible to change the address if a vendor has multiple purchasing addresses.
G/L Date – Select the appropriate G/L date (it will always default to today’s date). This will be the date used for the resulting G/L encumbrance journal entry.
Delivery Date – Optional field, for entering a desired delivery date for the items on the purchase order.
Expiration Date – Optional field, for entering an expiration date for the purchase order. Utilizing this field will give a warning to any user that tries to utilize this purchase order in the system after the expiration date.
Resolution Number – Optional, text field. This field can be printed on the purchase order form.
Assign to Buyer – If buyers are set up in the system, they can be assigned to individual purchase orders.
Item Detail Section
Item – Select an item to purchase. The system can be set up to allow users to enter items on the fly (not recommended), manually create new items, or pick items from a previously created item list. Further analysis can be performed on items to see buying patterns that have occurred in the past, including which vendors an item was previously purchased. To assist with item selection, the buttons Item Search, Item Analysis, Item Display Settings, and optionally Associating Items to an asset are included to the right of the Item field.
Description – Enter a detailed description to specify what type of item is being purchased. Example: Item = Paper, Detail Description = 8.5 x 11 White, High Gloss, Laser Printer Paper.
Detail Description Icon – Allows a user to add even more detailed description information, up to a limit of 512 characters. During the purchase order printing process, a user can also choose to include this additional detailed item description information on the printed PO form.
User Defined Field Icon – A user can add additional detail by using this User Defined Field Icon The customer should be asked if there are any additional requirements for their purchase order processing. If the customer has a need for an additional field, this is where it would appear. To establish a User Defined Field Icon, go to:
Maintenance > new world ERP Suite > Security > User-Defined Fields
Quantity – Enter the quantity of the item being purchased.
Unit of Measure – Select the unit of measure, which pulls from the Unit of Measure Validation Set. Note that typing the first letter of a unit of measure, such as an “E”, would pull in units of measure that start with “E”, such as “Each.”
Price per Unit – Enter price per unit. The system will calculate quantity times price per unit to show the total cost for that item. This field will be labeled List Price per Unit if Specify Discounts in Procurement is selected in Company FM Settings.
Discount Percent – The Discount Percent field will only be available if Specify Discounts in Procurement is selected in Company FM Settings. Users can enter an optional discount percent to be taken on the List Price per Unit. If entered, the new price per unit will be displayed to the right of this field. G/L Account – Select the G/L account to which the item should be charged. The user can type in the G/L account number, or use the Advanced Search icon to search for a specific G/L account. If an item needs to be charged to multiple G/L accounts, clicking on the Multiple G/L Icon will allow the user to assign an item to multiple G/L accounts. After saving the purchase order, a telescope icon next to the G/L account field will allow for a budget analysis to be performed on the G/L account that was selected.
Users will only have access to the G/L accounts they were assigned in User Based Security for the Purchasing Sub-ledger. The G/L Organization Sets which were assigned for the Purchasing Sub-ledger will govern the G/L accounts available for use.
Contract – If the Contract Accounting module is being utilized, users will be able to associate a purchase order item to contracts they have security rights to use. Contract search and analysis icons are available next to the Contract field.
Vendor Part Number – This is an optional text field. This field can be printed on the purchase order form as part of item detail information. It is intended to have the vendor’s part number for the item being purchased filled in, if known.
Employee – Provides the option of selecting an employee the purchase order should be associated with. This field pulls from the HR employee list if the HR module is active.
Ship Via – This field is optional. If a shipping preference is desired, this field would be used. If used, the options will pull from Validation Set # 36. This field is for informational purposes only. It can be printed on the purchase order form.
Ship To – This field defaults in when the functional department is selected. It can be changed by using the drop-down to select a different ship to location if needed.
Freight Terms – Optional field to select freight terms which pull from Validation Set # 28. This field is for informational purposes only, and can be printed on the purchase order form.
Confirming Request – This check box can be selected if entering a PO that has already been received and the associated invoice paid. This allows a user to enter the detail of the PO for future reference, even if not entered originally.
1099 Item – This box can be selected if the transaction is to a vendor that would require a 1099 to be issued at the end of the current year. When this purchase order is paid via the Accounts Payable process, the same box will also be selected for that A/P transaction. Selecting this box will generate a 1099 for this specific vendor.
Taxable Item – Select this box if the item being purchased is a taxable item.
Create New Asset – This box is used to identify fixed assets during the purchase order entry process. Selecting the box will link them to the Fixed Asset Management module (provided that the Item selected above is also set up as a fixed asset item, and the Fixed Asset Management module is in use).
Buttons on the Bottom of the Purchase Order Entry Screen
Save - This saves all entries that have been made on the screen. Once the purchase order has been saved, the user can add quotes, notes, and documents to the purchase order.
Save/New Item – Saves the entries that have been made on the screen, and allows the user to enter another item onto the same purchase order. The purchase order Header information re-populates for the next item to be added.
Save/New PO – Saves the purchase order, and takes the user to a new purchase order screen for entry of their next purchase order.
Delete Item – Deletes the current item displayed on the screen.
Delete PO – Deletes the entire purchase order shown on the screen.
Reset – This button resets any changed values on the screen back to the last time they were saved.
Icons on the Top of the Purchase Order Entry Screen
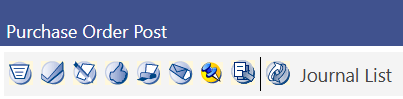
Purchase Order List Icons

Item List
The Item List view shows the header information for the purchase order, followed by a line listing of all the items on that purchase order. Clicking on P.O. Number will take the user back into purchase order entry mode for that item.
Entry
This is discussed in detail in the Entering Purchase Order section (page 1).
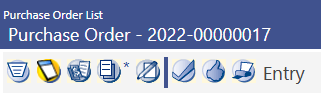
Quotes
Quote information can be attached to items on a purchase order. These quotes are for informational purposes and can be used as a way of documenting and retaining quote information for future reference. Items can have multiple quotes; which each can include information shown on the right-hand side of the quote screen. Only the Vendor and Amount per Unit fields are required. Note that the Reason field is based on Validation Set # 232, Bid Reason.
Attaching Documents
Microsoft Word, Excel, PDFs, images and other types of documents can be attached as reference or to justify the line item budget requests. To attach a document, click the Document Icon in the grid. The following screen will appear:
Document Pop-up from the Purchase Order Screen
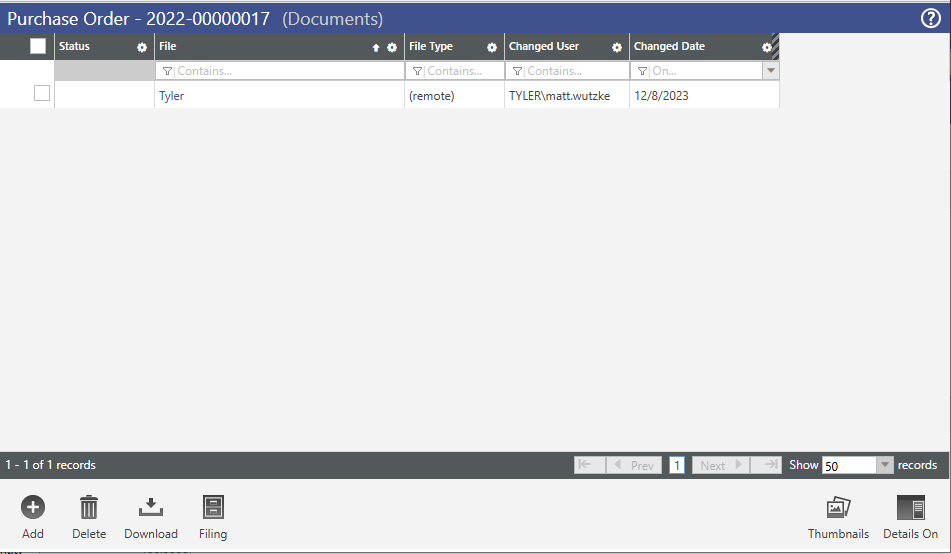
To add or attach a new document, click the Add button, then Upload.
Drop the appropriate document file in the Upload Files popup, or click in the popup to upload. The most common files types are:
- .doc - Microsoft Word documents
- .xls - Microsoft Excel documents
- .pdf - Adobe documents
Select the document file to be attached and click Open.
Once completed, close out of the document pop-up by clicking on the X on the top-right corner of the pop-up.
The attached document will now appear in the document menu.
Adding Notes
The notes feature provides a way of storing important narrative information related to a purchase order. It can also be used to communicate this information to other users in the system. If a user sends a note to another user or users, the note will appear in that users’ “myNotifications” section of the home page with a link to the purchase order. You can create a note by clicking the Notes icon. Notes can also be accessed in purchase order inquiry after the purchase order is posted.
To add a Note, click on the Notes icon. A pop-up will appear that will reflect any notes that have been added to the purchase order. To add a new Note, click on the + Add icon.
The Notes Pop-up from the Purchase Order Screen
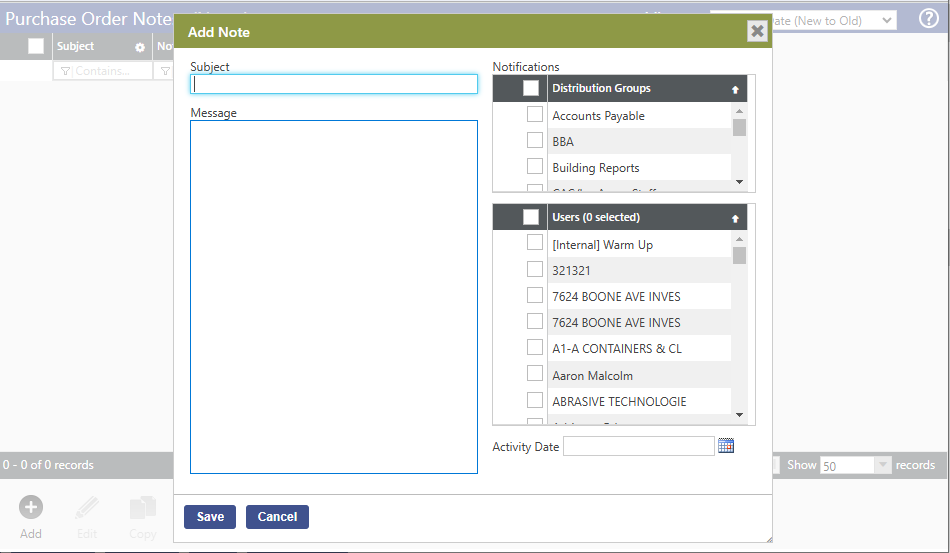
Subject – Enter a title that broadly explains what the note is about.
Message – Enter the body content of the note.
Users – If you wish to forward the note to another user or users, select the user(s) from the select box on the right-side of the screen. The users you select will then receive the note on their Notes panel on the home page.
From there, the user can click on the Message hyperlink to see the Purchase Order screen which will allow them to see the rest of the purchase order information.
Alternatively, the user can click on the Notes icon to simply read the note itself, and will even have the option to reply to the Note.
Validation, Approval & Printing from within a Purchase Order
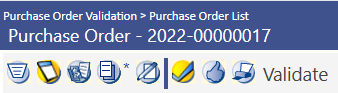
In addition to processing purchase orders via the standard workflow, it is also possible to validate, add approvals, and print purchase orders while inside the purchase order. The Checkmark, Thumbs Up, and Printer icons shown above allow users to perform each of these three tasks.
Clicking the Approval icon will reveal the necessary approval levels for the purchase order. Users will have options of approving, denying, and possibly returning particular purchase orders. Adding approval will move the purchase order to the next level of approval, or if it is currently at the highest level of approval, it will then be fully approved. Returning a purchase order will allow a lower-level user the opportunity to make changes before resubmitting for higher-level approval. Denying a purchase order will in effect cancel the purchase order. A cancelled purchase order may not be changed or later approved.
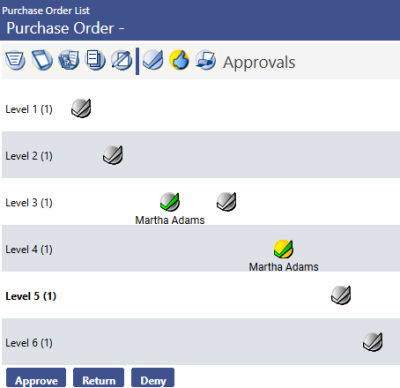
The Add Approval pop-up screen allows users to route an approval to a particular user or users if needed. If no users are selected, the system will route the approval request to all users at the next approval level. A user is also able to add a comment to their approval, which can be seen by subsequent approval users.
When approvals are sent to users at subsequent levels, those users receive approval reminders on their home page, on the Approvals panel.. Users are then able to click on any of the Source, Approval Status, or Transaction ID links in order to be routed directly into the appropriate areas on the purchase order.
Purchase Order Processing – Workflow
Once the Purchase Orders have been entered, they need to be taken through the workflow buttons shown on the Purchase Order List screen.
List
The List icon, on the far left is the first icon. It shows the status and other information related to each purchase order. The various columns are described below.
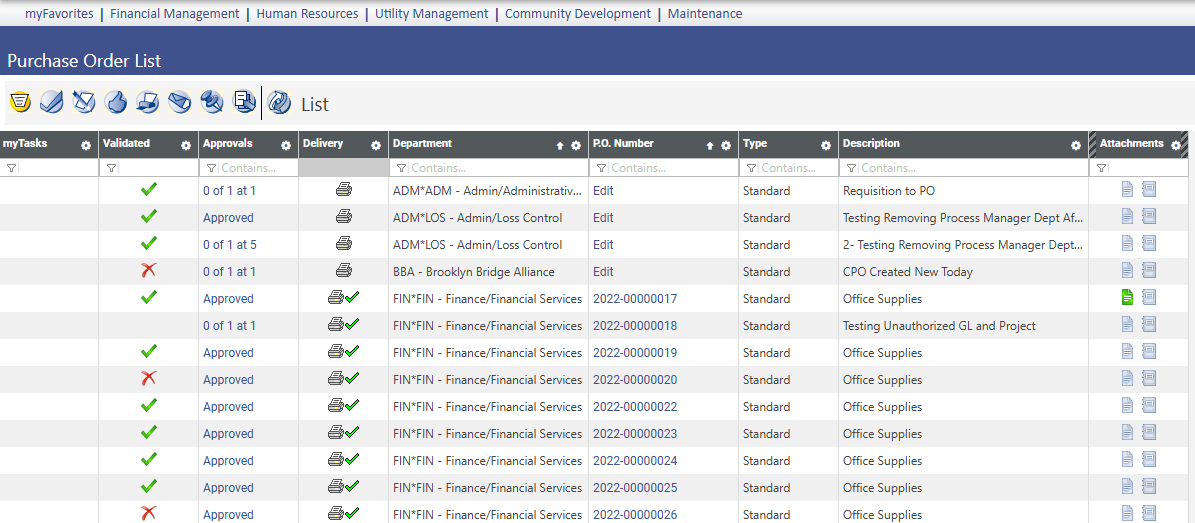
MyTasks – A green checkmark in this column indicates that a purchase order is waiting for that users’ approval.
Validated – A green checkmark in this column indicates that a purchase order has successfully completed a validation.
Approvals – Shows the current approval status of a purchase order.
Delivery – Indicates whether a purchase order needs to be printed or emailed. A Green Checkmark indicates that the printing or emailing step has been completed.
Department – Lists the Functional Department under which a purchase order was created.
P.O. Number – Lists the purchase order number. If the Company FM Settings box Display Unprinted Purchase Order Numbers is left cleared, the words “Edit” will be listed instead of a purchase order number until the time the purchase order is printed.
Type – Displays the Purchase Order Type used when creating the PO.
Description – Displays the description given to a purchase order by its creator.
Attachments – Lists icons for Documents, Remote Documents, and/or Notes, if any were added to the purchase order.
Validation
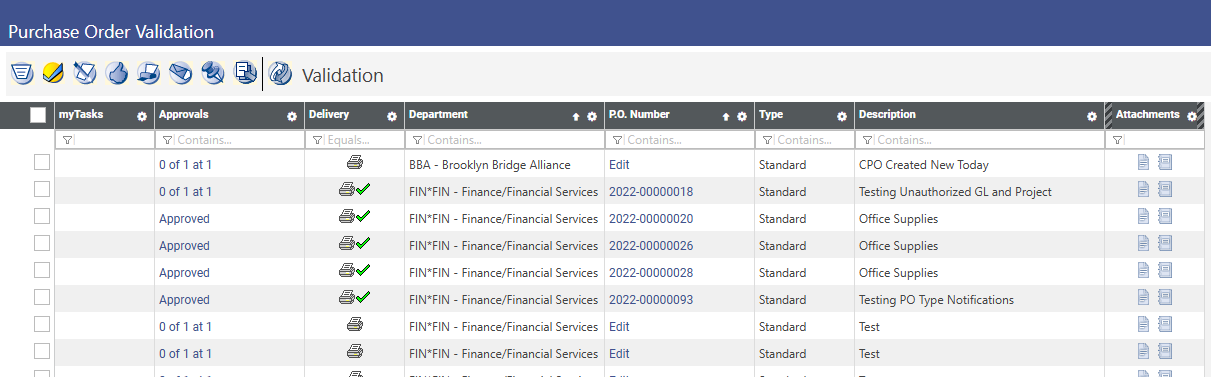
Validation of purchase orders checks budget availability as well as insuring no other purchase order rules have been violated. This step is a software validation. Check the box next to the desired purchase order(s). Click the Submit button.
Print Edit & Error Listing

Users have the option of printing an Edit Listing and/or Error Listing. Clicking the Show Preferences link on the right-side of the screen (not shown) reveals the output preferences shown above. Users can select the preferences which suit their needs, check the purchase orders needed, and then click the Submit button to process their report. These reports will then be available for viewing in myReports. Note that any selections made in the output preferences section will be saved for that user until a time at which they make any future output preference changes.
Approval
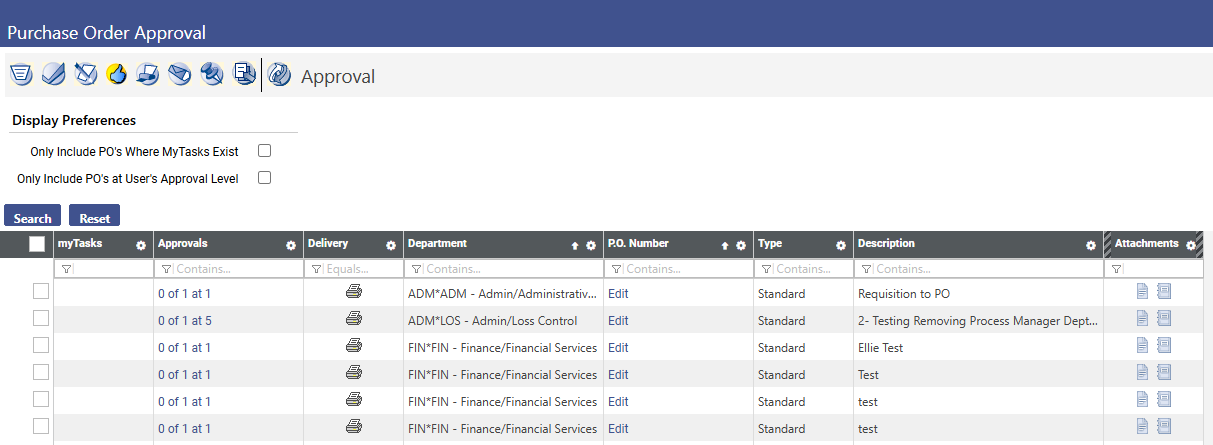
Users can check the purchase orders needing approval, and then click the Submit button. Note that only purchase orders ready for approval by the user will be available on this screen.
Once a purchase order has received all the required approvals, it will show up as “APPROVED” on the Purchase Order List. It will then be available for printing.
Print and/or Email
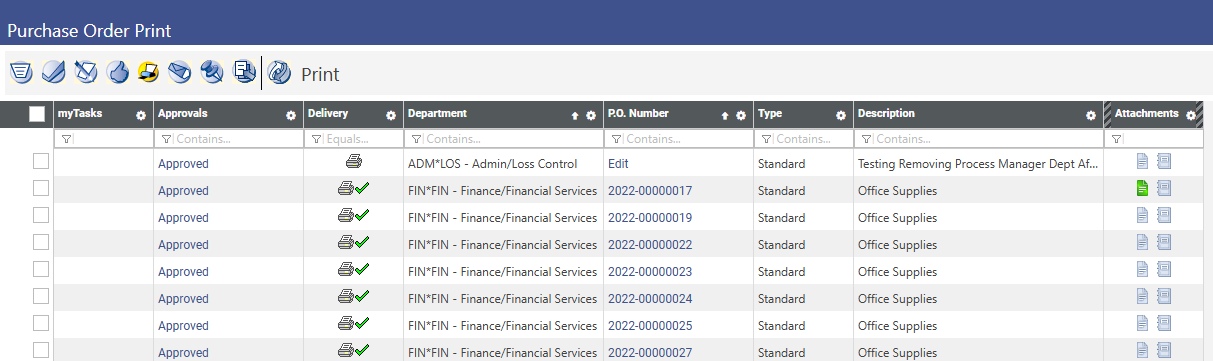

Once purchase orders have been approved by the necessary users, they are available to be printed or emailed. All purchase orders that have the printer symbol under the delivery column will be printed. If there is an envelope showing in the delivery column, they will be emailed to the vendor.
Clicking the Show Preferences link on the right- side of the screen (not shown) reveals the output preferences shown above. Users can select the preferences which suit their needs, check the desired purchase orders, and click the Submit button to print or email the purchase order. Note that any selections made in the Output Preferences section will be saved for that user until the time when they make other output preference changes.
Post
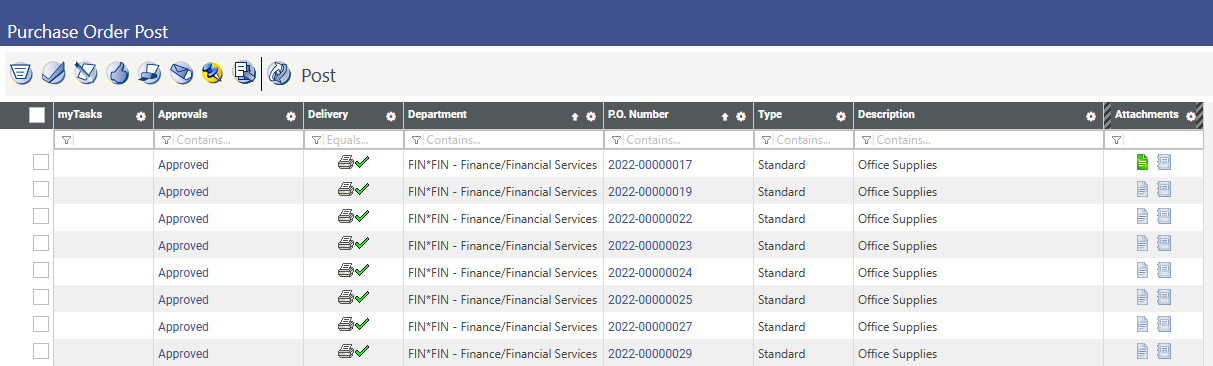
Once purchase orders have been printed or emailed, they are available to be posted. Users can check the purchase orders they wish to post, and then click the Submit button. Once posting has occurred, a purchase order will no longer be visible on the Purchase Order List. Posted purchase orders are then available for use in Accounts Payable. They are also available for changes in Change Purchase Orders.
Certain users may also have access to the last icon on the Purchase Order List screen called Journal List. Clicking this icon simply transports a user to the Journal List screen where they may want to process, and post the journal created as a result of posting the purchase order.
Change Purchase Orders Processing
Any changes made to a purchase order which has already been posted must occur in Change Purchase Orders. Possible changes include altering items, amounts, G/L accounts, as well as completing partially used purchase orders, or cancelling purchase orders in their entirety even if they were never utilized.
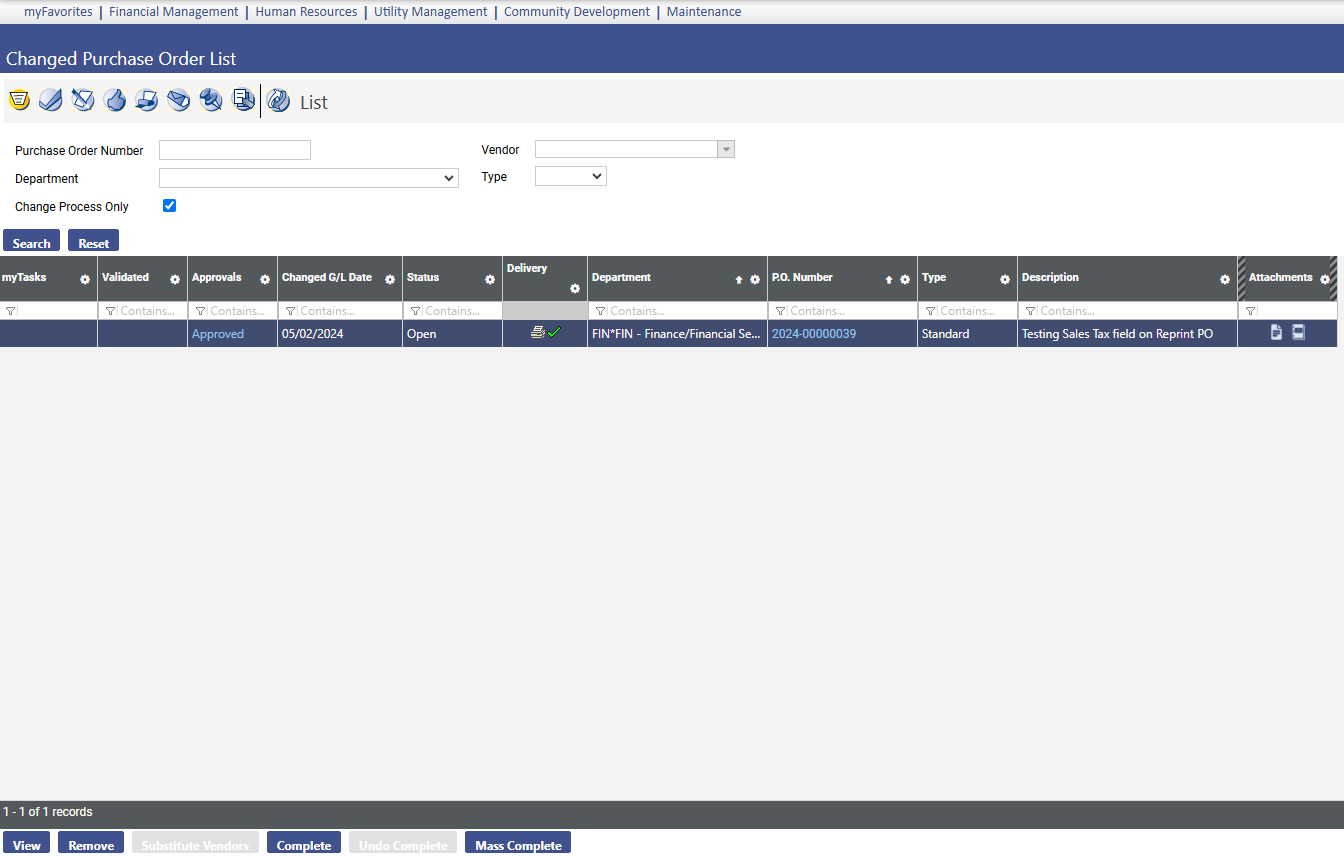
Change Purchase Orders List
The Change Purchase Orders List screen initially shows any purchase orders currently in a state of being changed. If a user desires to view or work with purchase orders not currently in a state of being changed, the user must uncheck the Change Process Only check box. Similar to the Purchase Order List screen, this list screen gives basic information about purchase orders the user has security rights to view. Note that once a purchase order has been completed, it will no longer be available in the Change Purchase Order area.
Financial Management > Procurement > Purchasing > Change Purchase Orders
Search criteria are available in the top part of screen so you can narrow your search, or search for a specific purchase order. Once a purchase order is available on the screen, there are various options available via buttons near the bottom of the screen to view or process the purchase order.
View – Highlight a purchase order and click View to see the details of the purchase order. This allows you to see the PO detail without putting the purchase order into an Open Change Status.
Remove – Highlight a purchase order (currently in the change process), and click the Remove button to remove the PO from an Open Change Status. Please be aware that any PO that is in an open status will not be pulled into an invoice until the change is complete or open status is removed.
Refresh – Updates the Change Purchase Order List to reflect the most recent activity.
Substitute Vendors – Allows authorized users to view and maintain the list of substitute vendors that are allowed for the purchase order, if the type of purchase order allows substitute vendors.
Complete – This will un-encumber any outstanding encumbrance amount, and remove it from the Change Purchase Order List after it is processed thru the Change Purchase Orders workflow buttons. Completing a purchase order which has already been partially utilized will result in that purchase order being moved into a C-Pending status (Complete Pending). Completing a purchase order which has never been utilized in Accounts Payable Invoicing will result in that purchase order being moved into a V-Pending status (Void Pending).
Undo Complete – Removes the C-Pending or V-Pending status from a purchase order, and returns the purchase order to an Open status. Open status simply means that the purchase order has been initiated in the Change Purchase Orders process.
Mass Complete – Used for marking multiple POs complete at a time. Can run the open PO report to review all the open POs and then use the mass complete button to select all of the purchase orders that should be complete.
PO Number – Clicking on a Purchaser Order number will place the PO in edit mode, where most fields can be changed.
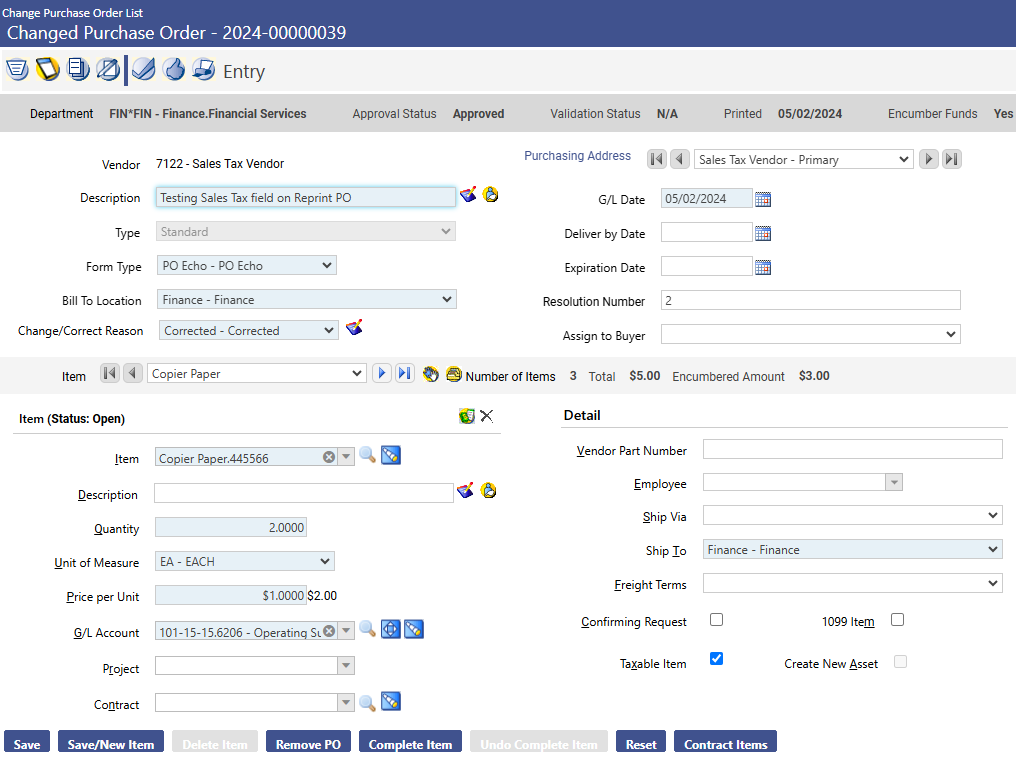
When in edit mode for a Changed Purchase Order, it is possible to complete a single item on the purchase order (as opposed to the entire purchase order) by clicking the Complete Item button near the bottom of the screen. If an item is marked to be complete, it is also possible to undo this action by clicking the Undo Complete Item button when that item is displayed on the screen.
In order for changes to take effect, the changed purchase order must be saved and then moved through the Changed Purchase Orders workflow icons. These are the same workflow icons described earlier in the Purchase Order Processing – Workflow:
- Validate
- Print Edit Listing
- Approve
- Print/Email
- Post
Purchase Order Templates
The system allows users to create purchase order entry templates which can then be used repeatedly while in standard Purchase Order Entry mode. Using pre-built templates will allow users to be more efficient when creating purchase orders. These templates can be particularly helpful for purchase orders which contain multiple items and/or multiple G/L accounts, and for purchase orders which are either the same, or very similar, each time they are utilized.
Purchase Order Template List
The Purchase Order Template List screen shows all purchase order templates which have been created, which a user has security rights to view and use. The list screen gives basic information about the template purchase order. Purchase order templates can be opened by clicking on the description. In addition, purchase order templates on the list can be sorted by clicking on the various column headers. Clicking the New button will allow a user to create a new template purchase order. Existing template purchase orders can also be deleted from this screen.
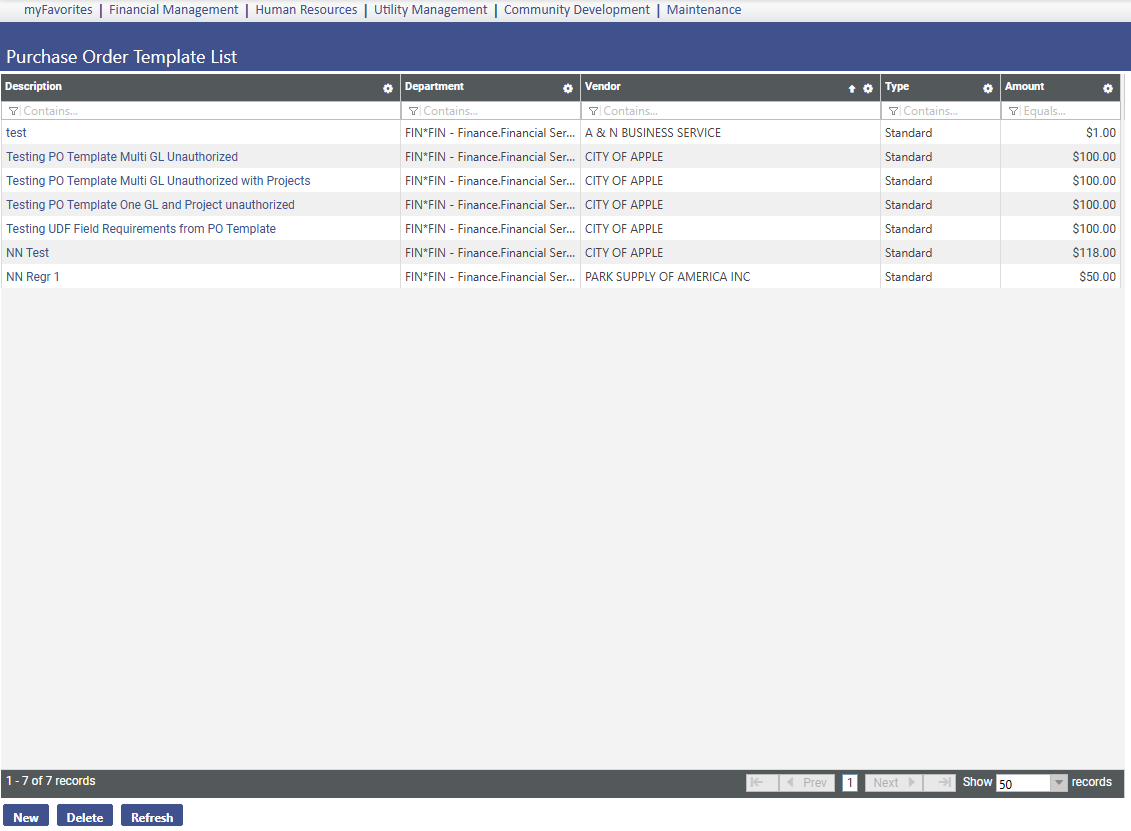
Financial Management > Procurement > Purchasing > Template Purchase Orders
Creating Purchase Order Templates
Clicking the New button on the Purchase Order Template List screen will allow the user to create a new purchase order template.
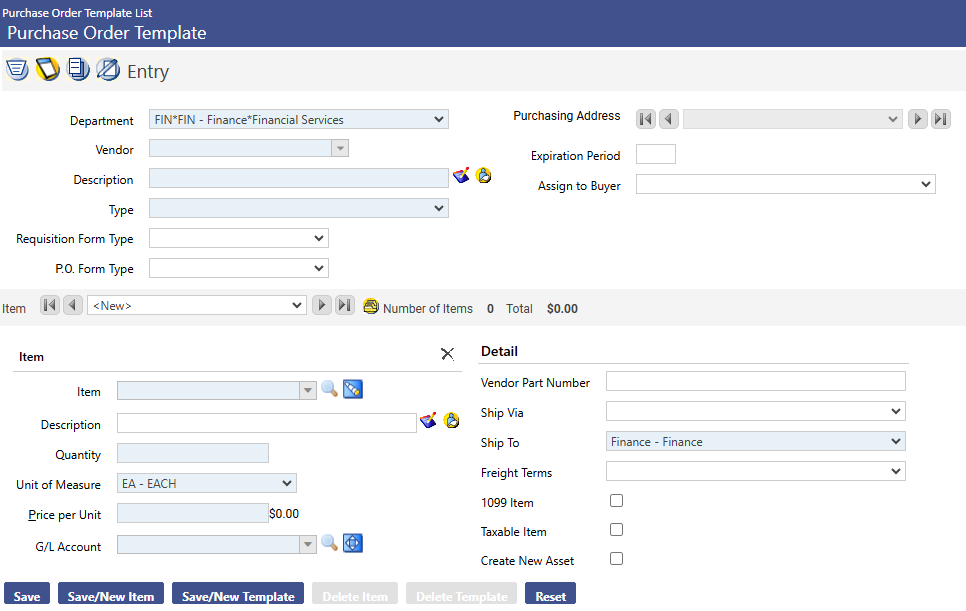
The Purchase Order Template entry screen closely resembles the standard purchase order entry screen described in detail earlier in this guide.
The top portion of this screen is the purchase order header section, which contains general information related to the purchase order. The bottom portion is where purchase order item detail entry occurs. Subtle differences include the fact that there are no date related fields on the template purchase order, as these will be added when the template PO is turned into an active purchase order. Also, there is an added Requisition Form Type field, since purchase order templates can be used to create both requisitions and purchase orders.
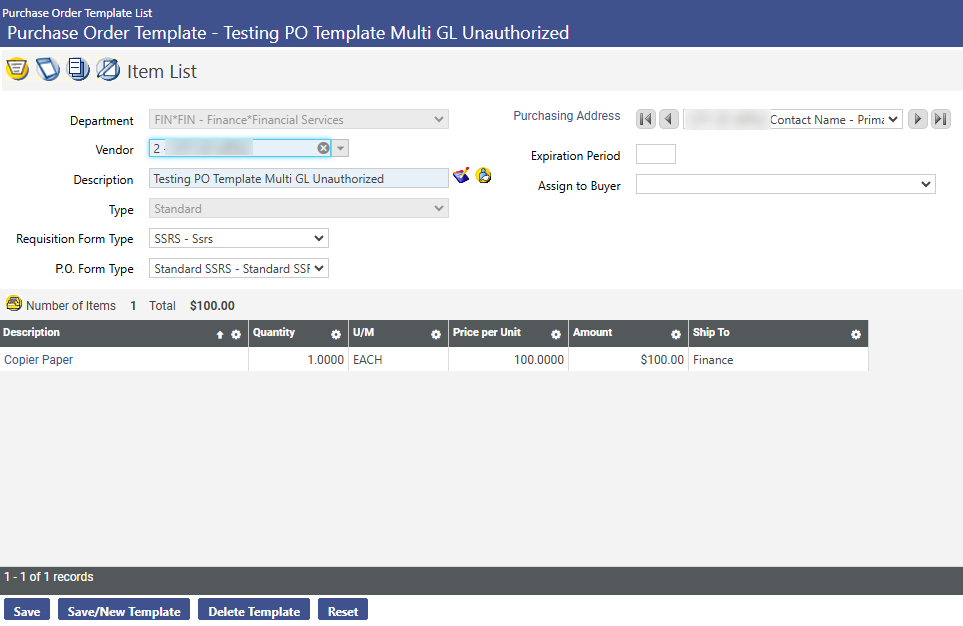
Clicking on the Item List icon on the upper-left side of the screen will take the user to a screen where they can easily view all items entered on the template purchase order.
Once a purchase order template has been created, it is available for use in standard purchase order entry.
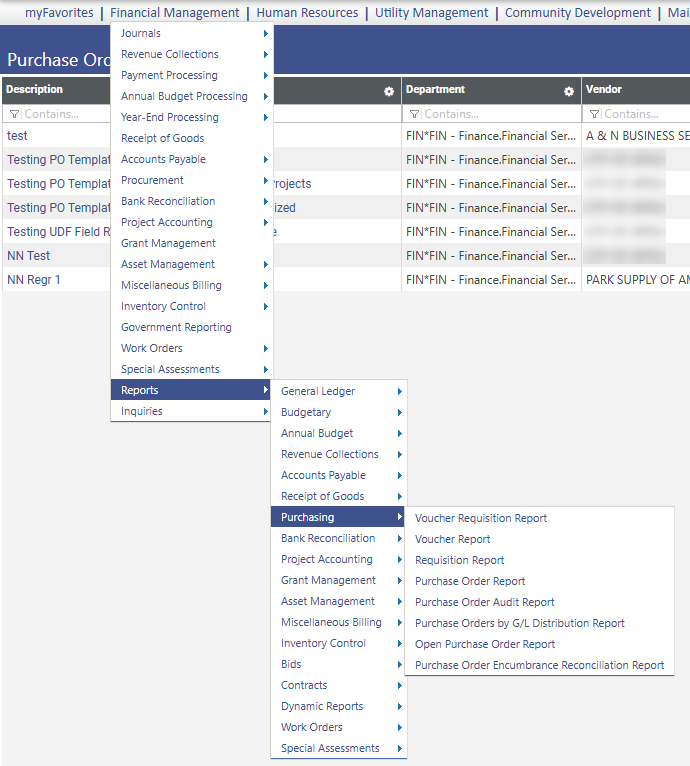
Purchase Order Reports
Purchase Order Reports can be found by navigating to Financial Management > Reports > Purchasing. Budgetary Reports are also under the Reports menu. These include current year monitoring reports.
Purchase Order Report
To execute the report, navigate to Financial Management > Reports > Purchasing > Purchase Order Report
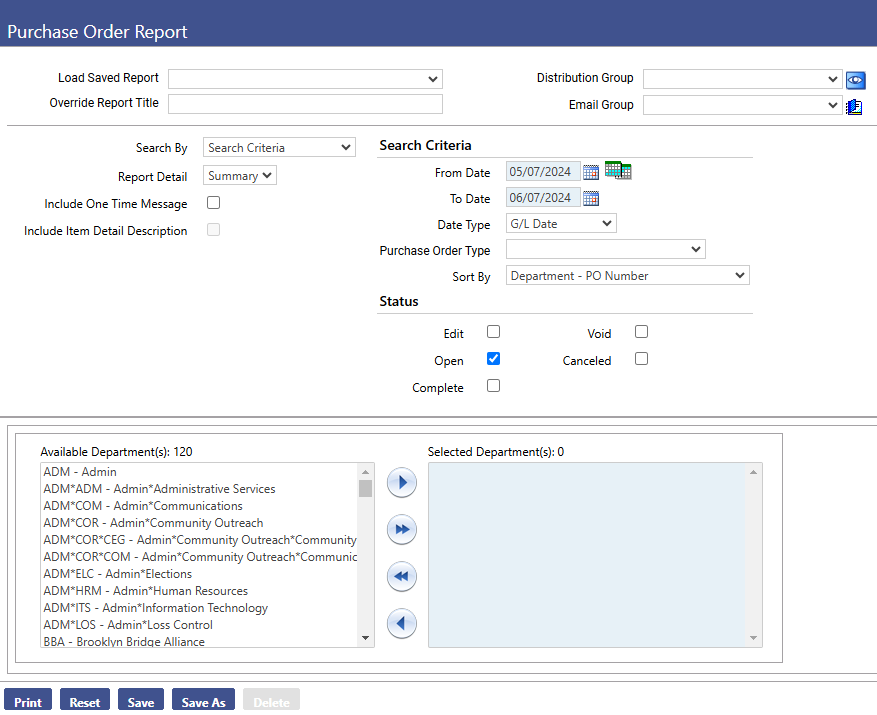
Report Selection Criteria:
Report Detail - Select either Summary or Detail.
Sort by Account Type - If selected, the report will list all revenues and all expenses. If not selected, the report will list Organization Set, Revenues, and Expenses within the Organization Set. The next Organization Set will then be listed.
Subtotal by Classification Level - This drop-down will drive account classification subtotals on the report. If desired, the sub-totals can be provided at classification levels, one to three.
Summarize to Organization Level - This setting would typically be left blank. As an exception, the report can be run to summarize account information at a higher Organization Set level.
Page Break Level - This setting is only meaningful if you plan to print the report. Page breaks can be established by utilizing this field.
Include Comments - Select an option here if you wish to print comments entered into the budget. Comments can be printed along with individual line items or grouped together in a footnote.
Print Transactions - If this box is selected, the Transaction Type, Budget Level, and Transaction Order become available.
Transaction Type – Select whether you would like to see Position Budgeting Details, Budget Transaction Details or both.
Budget Level - Select the budget level which you would like the transactions printed.
Transaction Order - Transactions will be sorted based on the selection here. The options are Alphabetical, Entry Order or by Amount.
Create Microsoft Excel File - This gives you the option of sending your report directly to Excel from myReports. This Excel export will contain summary formulas in subtotal fields.
On the bottom of the screen are three tabs for filtering the report:
Organization - Select the general ledger organization sets to include on the report.
Accounts - Select the accounts to be included.
Balances to Include - This tab includes a number of optional columns that can be chosen to include in the report. Up to seven columns can be selected for a single report.